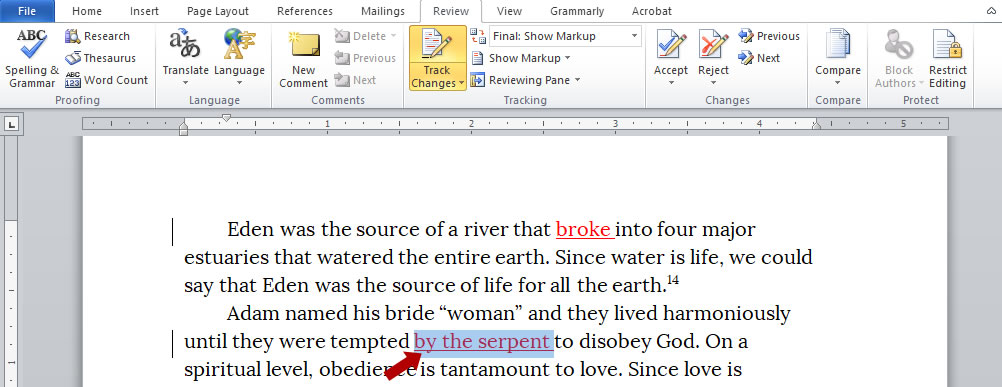
If you ask an editor to revise your manuscript, there must be a way to track the revisions so you can accept or reject the edits that were made. Microsoft Word has a tracking feature to do just that. If you have SimplePublish edit your manuscript, we will be using this feature.
Understanding and configuring this feature is vital so you can view the document and see what revisions were made as well as view the fully revised document after you've accepted or rejected the edits.
This tutorial will help you understand and configure the Tracking and Change features of MsWord.
Turn on the tracking feature
The first thing to do is to turn on the tracking feature of MsWord. Look for the TRACKING panel, and there select TRACK CHANGES.

Make sure the tracking feature is on
The tracking button should change color. In this version of MsWord, it turns light orange.

See edits inline
There are several ways to view edit, but the best way is to see revisions inline. This means you see what items were deleted and added in the same line. To do this, go to the Tracking Panel. Select the SHOW MARKUP button, which will display more options. Select the BALLOONS option, and then the SHOW ALL REVISIONS INLINE.

Select which Markup to display
There are several displays to select from, but the one you want to use for viewing revisions is the FINAL:SHOW MARKUP option. This shows all the revisions that were made by your editor.

Go to the edited parts of the document
Make sure you place your cursor at the beginning of the document. This is an important step because MsWord will search the document from the start.
When you have done this, go to the CHANGES panel, and there select NEXT.
MsWord will automatically highlight the next revision that was made. Items that have a strikethrough means the editor deleted it, while underlined items mean the editor added it.

Accept or Rejecting the revision
You can choose to accept this particular edit. To do this, go to the CHANGES panel, and there select ACCEPT.
You will immediately see that the deleted word is no longer visible as it has been deleted.
You will then be brought to the next instance where a revision was made.
If you want to reject the edit, click the REJECT button.

Accepting all revisions
If you want, you can choose to accept all revisions. To do this, go the CHANGES panel, and select the dropdown button under the ACCEPT button. On the options that open up, select ACCEPT ALL CHANGES IN THE DOCUMENT.

Manually go to the next revision instance
If you wish, you can go to the next instance where a revision was made. Just click the NEXT button on the CHANGES panel.
Accept/Reject edits until you get to the end of the document.

Viewing the final version
After you've accepted/rejected the revisions, you can view the entire document as it would appear. To do this, go to the TRACKING panel, and this time select FINAL in the tracking display option.

Activating comments
Sometimes you may want to make comments to yourself or for the editor to see. Just highlight the words you want to comment on, and then on the COMMENTS panel, select NEW COMMENT.

Writing comments
MsWord will open a pane where you can see a summary of revisions. It will also show comments made, and by whom.
This is where you can write the comments on the words you have highlighted.


